IoT — Communication protocols
Author
KalleDate Published

This session will be a bit more theoretical, because the resulting behavior of the server and the program running on the Raspberry Pi won't change much. The goal is to re-implement the client-server communication from last session, but with a more efficient communication protocol.
Last time the data was transferred via HTTP-requests. HTTP or the "hypertext transfer protocol" is the standard of day to day web communication, as the name suggests it is text based and developed to transfer mostly textual information like websites. Besides the actual content there is a header block containing meta information about the request made.
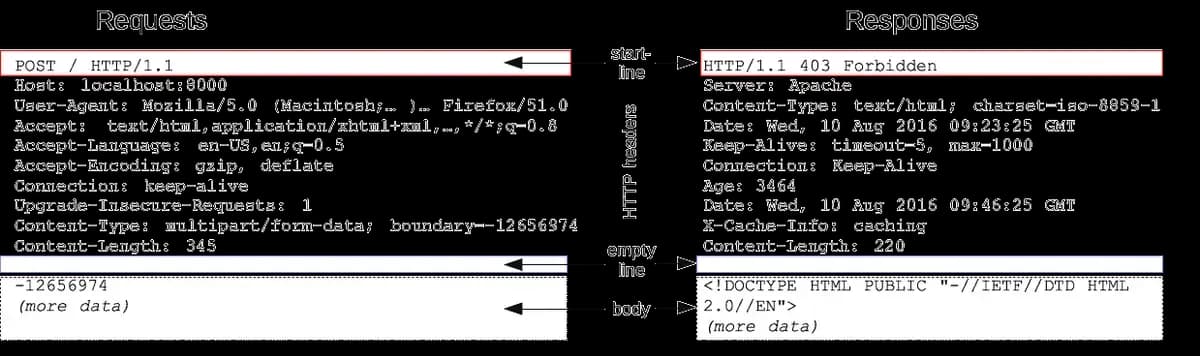
Especially the header block can get pretty large in comparison to the payload transferred in the body.
For comparison look at MQTT, it is a message protocol made for machine to machine communication. Instead of relying on strings to represent information the default is binary. Like HTTP MQTT has a header to declare what kind of information the message holds. But the minimum size is only 2 bytes.
The first 4 bits of the header define the message type:
CONNECT - 0001CONNACK - 0010PUBLISH - 0011PUBACK - 0100PUBREC - 0101PUBREL - 0110PUBCOMP - 0111SUBSCRIBE - 1000SUBACK - 1001UNSUBSCRIBE - 1010UNSUBACK - 1011PINGREQ - 1100PINGRESP - 1101DISCONNECT - 1110
The remaining 4 bits of the first byte are used to further specify the behavior of the request defined by the type bits. For example: A publish message can specify a quality of service (QoS) to be delivered at most once, at least once or exactly once.
The second byte of the fixed header length is used to describe the length of the actual message. Seven bits are used as a numeric value and the eighth is a "continuation" bit, which is set when the message is longer then 7 bits can describe. With this technique the length information can grow to 4 bytes long to send messages up to 256MB large.
So a minimal message would look like this: 1100 0000 0000 0000 (disconnect). For numeric data the benefits are easy to see, but also text based data can be sent easily because the message body has no specified format.
Besides this obvious advantages there is of course also the drawback of a binary format that's not human readable, so debugging is more complicated and custom binary formats almost always mean more work to support them. The decision what protocol is best for your use case can most times be made depending on the scale. That's why in industrial scale scenarios where potentially millions of messages come together in minutes or seconds the used protocols are always optimized for small message footprints.
Publish and subscribe
Instead of programming a server to receive the message and digest it MQTT works with a message broker which receives all messages and delivers them to clients which have subscribed to them. All messages are published to a specific topic which is then used by the broker to deliver the message only to clients subscribed to this specific topic. A topic is a string, which behaves pretty much like an URL. A valid topic would be home/livingRoom/temperature.
For subscriptions there are special characters used for wildcards. If you want to get all messages coming under the topic home you can subscribe to home/#. If you want to be a little more specific and only one layer of wildcard you can use the + symbol. Every value posted to the living room in your home would be home/livingRoom/+, or every temperature value in all rooms in your home could be home/+/temperature. You can read more on those rules in the official spec.
Because an MQTT broker is not completely easy to run on all platforms I suggest the service cloudmqtt. This platform provides the "Cute Cat" plan free of charge for small hobby projects. When you have created an MQTT instance you can create a node program using the mqtt package.
To test your instance you can use this hello world implementation:
It connects to the server, subscribes to the presence topic and when the subscription is built successfully it sends a "Hello mqtt" message on the presence topic. When the client receives a message it logs it to the console and ends the connection.
Tasks
- Create an MQTT server (cloudmqtt has a free to use plan)
- Extend the sensor server implementation to listen for sensor events from your device
- Extend the sensor readings implementation to publish the sensor values via MQTT
- Instead of sending the values as JSON send it as binary data with an Uint8Array

IoT — Internet of things and the cloud
Discover how IoT leverages cloud computing to manage and process data from connected devices. This post covers setting up a Node.js app on Heroku, using Git for deployment, and integrating MQTT for real-time data synchronization.
Mailing List
If you want to receive updates on new posts, leave your email below.